
Editor Tools
The Neocortex dock, Tools menu, inspector pickers and debugger tab in Godot 4. Manage your API key, pick AI characters and add a working chat in one click.
The plugin adds a few tools to the Godot editor, so you can set up AI characters without copying ids or wiring nodes by hand.
The Neocortex dock
The Neocortex dock sits next to the Inspector.
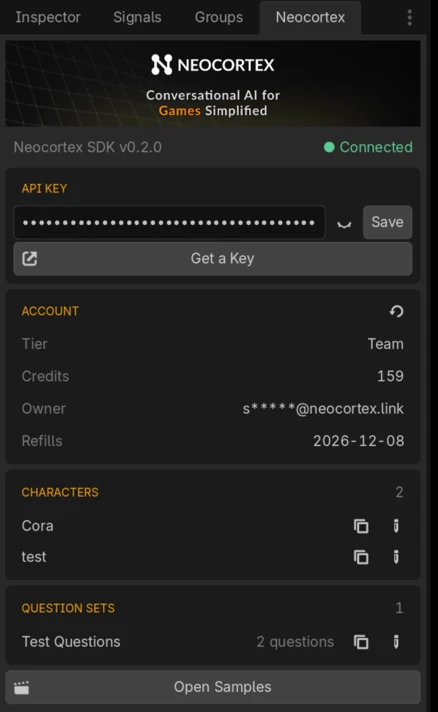
From top to bottom, it holds:
- Header: the SDK version, and a status chip that shows whether your key is connected.
- API Key: paste your key and press Save, or press Enter. The eye button shows the key. Get a Key opens the API Keys page.
- Account: your plan tier, the team owner, your remaining usage and when it refills. The refresh button fetches it again.
- Characters and Question Sets: everything on your team. Each row has a button to copy the id, and one to use it on the selected node, which writes the id into the selected agent's
character_idorquestion_set_id. Ctrl+Z undoes it. Each list shows up to five rows and scrolls when you have more. - Open Samples: opens the samples launcher.
The same view opens as a window from Project > Tools > Neocortex > Settings.... The first time a project has no key, the window opens by itself.
The key is saved in addons/neocortex-godot-sdk/neocortex_settings.tres. Add that file to your .gitignore.
The Tools menu
Project > Tools > Neocortex adds things to the scene you have open:
| Item | Adds |
|---|---|
Settings... | Opens the settings window. |
Complete Text Chat | A NeocortexChatUI with an agent, a chat panel, a thinking indicator and a text input, all wired. The agent uses TEXT mode. |
Complete Voice Chat | The same with a microphone, a voice input widget and a microphone picker instead of the text input. The agent uses SINGLE_AUDIO mode. |
Chat Panel, Text Chat Input, Audio Chat Input, Microphone Dropdown, Thinking Indicator | One widget, under the selected Control or CanvasLayer, or under a NeocortexUI canvas layer at the scene root. |
Open Samples | Opens the samples launcher. |
Documentation | Opens these docs. |
After a complete chat is added, its agent is selected so you can pick a character straight away.
Inspector help
NeocortexSmartAgentandNeocortexQuizAgent:character_idandquestion_set_idbecome dropdowns of your characters and question sets, with the number of questions in each set. You can still paste an id. Without an API key, a warning with an Open Neocortex Settings button shows instead. Without a character or set picked, a prompt reminds you.NeocortexInteractable: the resolved id that actions target, with Copy.NeocortexAudioReceiver: a microphone picker, and a warning whenEnable Inputis off in the project settings.
Debugger > Neocortex
While your game runs from the editor, the Neocortex tab in the Debugger panel shows:
- Each microphone's live level against its threshold, the silence countdown, push to talk, and the device in use
- Each agent's character, chat lines mode and state, queued messages, last line, last error and session id
Use it to tune amplitude_threshold and max_wait_time on a NeocortexAudioReceiver, or to see why a character went quiet.
Styling the widgets
The widgets in addons/neocortex-godot-sdk/nodes/ use NeocortexTheme.tres: dark pills with amber outlines and accents. Edit it, or set your own theme on a widget, to restyle them. The bubble colors are export properties on NeocortexChatPanel.
Quick Start
Install the Neocortex Godot SDK and talk to an AI character in Godot 4 by text or voice, with a ready chat scene, seven samples and a few lines of GDScript.
Samples
Seven Neocortex Godot SDK sample scenes with text and voice chat, actions, interactables, group chat, usage gating and a quiz show for AI NPCs in Godot 4.